> ## Documentation Index
> Fetch the complete documentation index at: https://dripart-nav-docs-metadata-batch2.mintlify.site/llms.txt
> Use this file to discover all available pages before exploring further.
# 如何在 ComfyUI 中安装自定义节点
> 本部分将指导你如何使用不同的方式来进行 ComfyUI 自定义节点的安装
## 什么是自定义节点?
自定义节点是 ComfyUI 的扩展,能够增加新功能,如高级图像处理、机器学习微调、颜色调整等。这些节点由社区开发,可显著扩展 ComfyUI 的核心能力。
在安装自定义节点之前,请务必仔细审查它们。由于 ComfyUI 是一个开源项目,恶意插件可能会利用自定义节点进行攻击:
1. 只安装来自可信作者和社区常用的自定义节点
2. 在安装前了解插件的功能,并避免未知来源,以确保系统安全
3. 避免安装冷门或可疑的插件 - 未经审核的插件可能存在安全风险,可能导致系统被攻破
所有自定义节点的安装都需要完成以下两个步骤:
1. 将节点代码克隆到 `ComfyUI/custom_nodes` 目录
2. 安装所需的 Python 依赖项
本指南比较了三种安装方法。**ComfyUI Manager** 已内置到当前大多数 ComfyUI 发行版中。先从 [ComfyUI Manager 概述](/zh/manager/overview) 了解其功能及如何启用。当某个节点不在注册表中,或你需要特定版本时,请使用 **Git clone** 或 **ZIP**。
| 方法 | 优点 | 缺点 |
| ----------------------- | ----------------------------------- | ----------------------------------------- |
| **ComfyUI Manager**(推荐) | 1. 自动化安装
2. 依赖项处理
3. 图形界面 | 无法直接搜索未在注册表中注册的节点 |
| **Git Clone** | 可以安装未在注册表中注册的节点 | 1. 需要 Git 知识
2. 手动处理依赖项
3. 安装风险 |
| **仓库 ZIP 下载** | 1. 无需 Git
2. 手动控制 | 1. 手动处理依赖项
2. 无版本控制
3. 安装风险 |
提示:在安装自定义节点之前,请查看插件的 README 文件,以了解其安装方法、使用方法以及依赖项,例如特定模型、依赖版本和常见问题的解决方案。
## 方法一:ComfyUI Manager(推荐)
使用此方法前,请确认你的环境中已可用 ComfyUI Manager。若缺失或未启用,请参阅 [ComfyUI Manager 概述](/zh/manager/overview) 和 [安装指南](/zh/manager/install)。
ComfyUI Manager 提供了两种 UI 版本来管理自定义节点。请选择与你界面匹配的指南:
新版节点管理界面,Desktop 用户默认启用。
经典的 Manager 界面,用于安装自定义节点。
## 方法 2:使用 Git 手动安装
适用于在管理器(Manager)中找不到的新节点,或需要特定版本的情况。需要你的系统已安装 [Git](https://git-scm.com/)。
在 GitHub 上点击“Code”按钮并复制 HTTPS 链接
```bash theme={null}
cd /path/to/ComfyUI/custom_nodes
```
```bash theme={null}
git clone [repository URL]
```
必须在你的 ComfyUI 环境中安装依赖,注意不要与你的系统环境混淆,以免造成污染
对于 Windows 便携版,请在嵌入式 Python 环境中安装依赖
```bash theme={null}
python_embeded\python.exe -m pip install -r ComfyUI\custom_nodes\[node directory]\requirements.txt
```
在你的 ComfyUI 环境中安装依赖
```bash theme={null}
cd [node directory]
pip install -r requirements.txt
```
重新启动 ComfyUI 并刷新浏览器。检查启动日志中是否有任何 `import failed` 错误
## Method 3: ZIP Download Installation
Suitable for users who cannot use Git or Manager
We don't recommend this installation method as it loses version control capabilities
Click `Code` → `Download ZIP` on the GitHub page
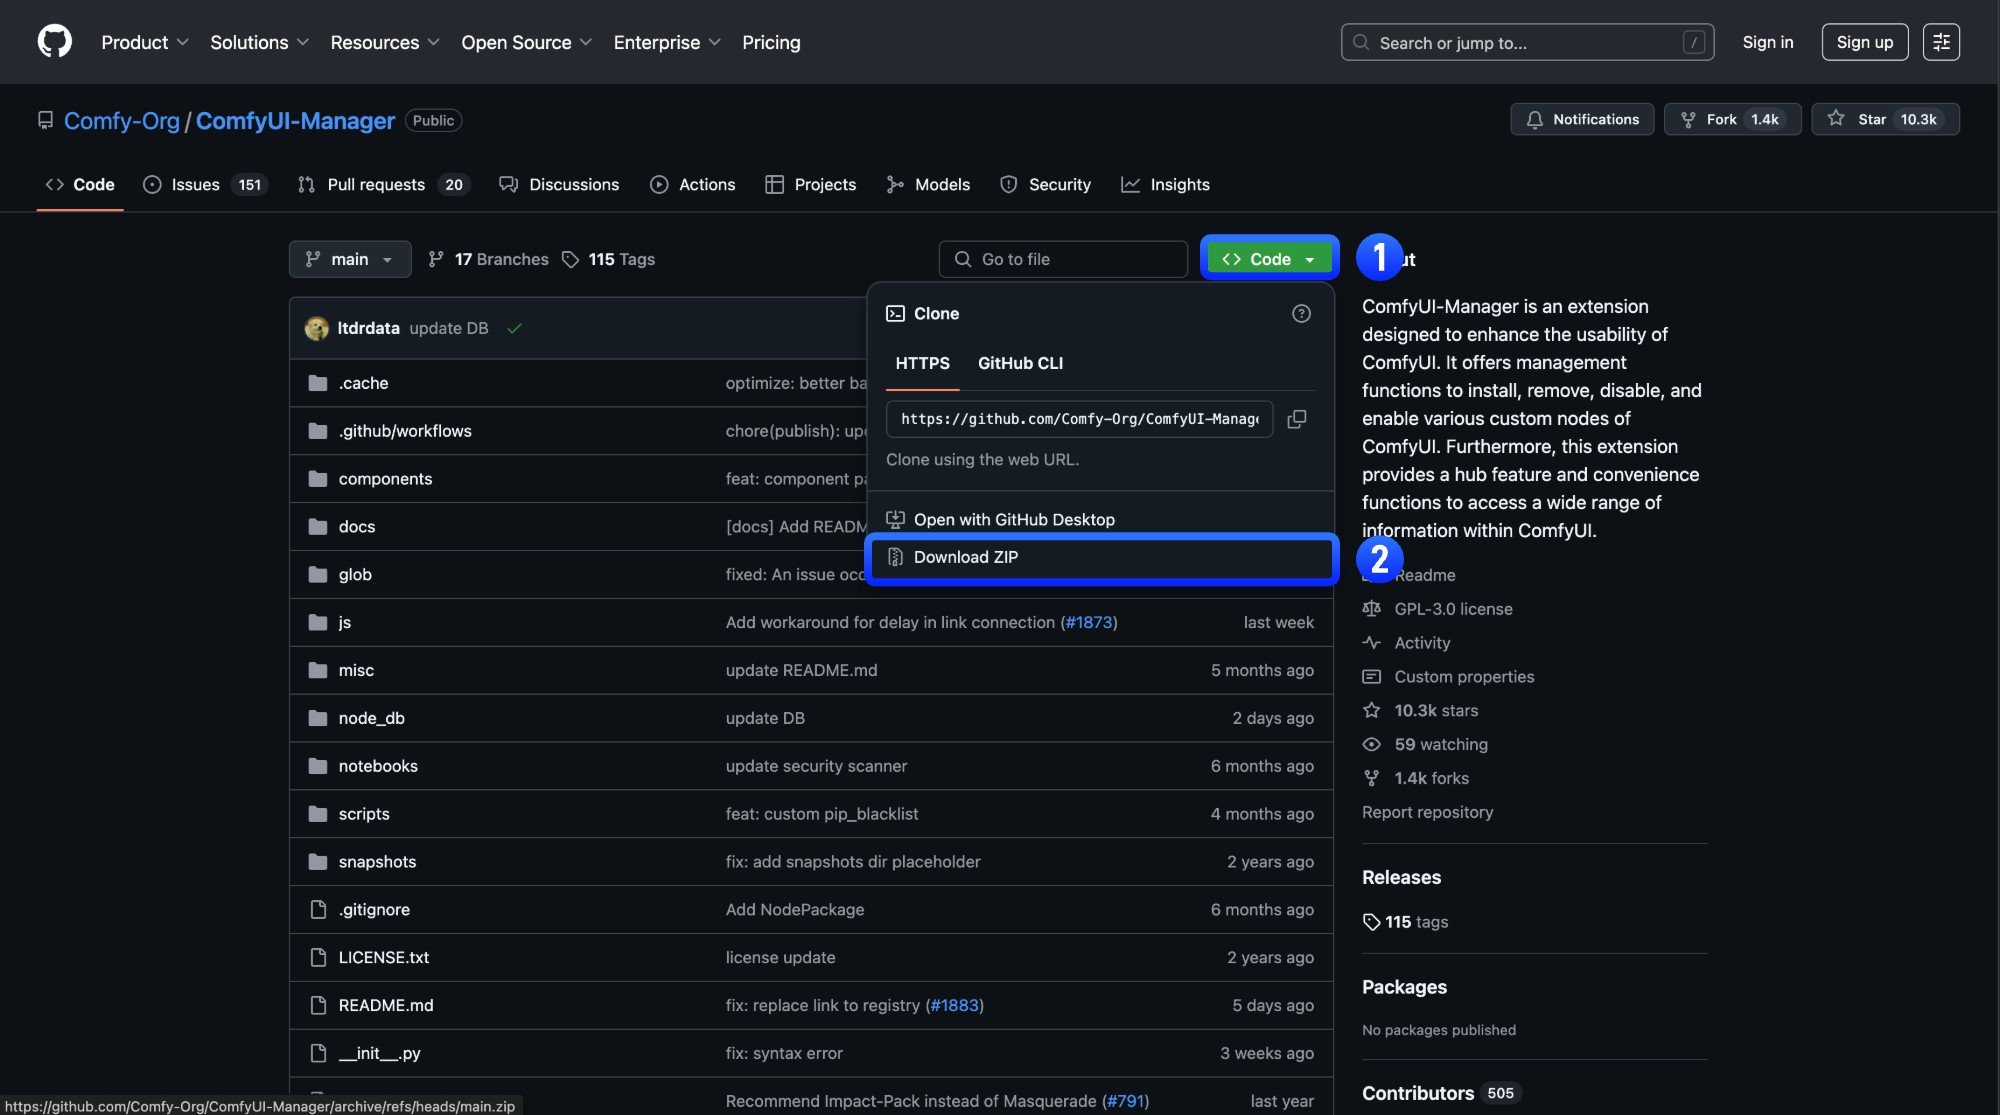 Extract the downloaded ZIP file
Copy the extracted folder to `ComfyUI/custom_nodes/` directory
Restart ComfyUI and refresh browser
Check ComfyUI Manager after restart to confirm the plugin installed successfully and there are no `import failed` errors
## 自定义节点资源
在 ComfyUI 中,除了基本的节点扩展功能之外,自定义节点还可以包含以下附加资源:
* [节点文档](/zh/custom-nodes/help_page):该功能支持所有自定义节点和基础节点。您可以使用它查看节点文档、了解节点的用途和用法,并通过 PR 向作者贡献文档。
* [自定义节点工作流模板](/zh/custom-nodes/workflow_templates):由节点作者提供的示例工作流模板,可以从 ComfyUI 模板中浏览和加载。
* [多语言支持](/zh/custom-nodes/i18n)
如果您是自定义节点开发者,可以添加这些资源,让您的自定义节点对用户更友好。
Extract the downloaded ZIP file
Copy the extracted folder to `ComfyUI/custom_nodes/` directory
Restart ComfyUI and refresh browser
Check ComfyUI Manager after restart to confirm the plugin installed successfully and there are no `import failed` errors
## 自定义节点资源
在 ComfyUI 中,除了基本的节点扩展功能之外,自定义节点还可以包含以下附加资源:
* [节点文档](/zh/custom-nodes/help_page):该功能支持所有自定义节点和基础节点。您可以使用它查看节点文档、了解节点的用途和用法,并通过 PR 向作者贡献文档。
* [自定义节点工作流模板](/zh/custom-nodes/workflow_templates):由节点作者提供的示例工作流模板,可以从 ComfyUI 模板中浏览和加载。
* [多语言支持](/zh/custom-nodes/i18n)
如果您是自定义节点开发者,可以添加这些资源,让您的自定义节点对用户更友好。